Battery switch on travel trailer function is crucial for managing your RV’s power. Understanding how your battery switch works is key to preventing dead batteries, protecting your appliances, and enjoying hassle-free camping. This guide breaks down the different types of switches, their roles in your electrical system, and how to troubleshoot common problems. We’ll cover everything from basic wiring diagrams to safety precautions, ensuring you’re confident in handling your travel trailer’s power setup.
We’ll explore the various types of battery switches available – single, dual, and rotary – highlighting their pros and cons. Learn how these switches control power flow between your house batteries and your tow vehicle, preventing unwanted drain and safeguarding sensitive electronics. We’ll also delve into practical troubleshooting, preventative maintenance, and safe installation or replacement procedures.
Troubleshooting Common Battery Switch Issues
Your travel trailer’s battery switch is a crucial component, controlling the flow of power between your trailer batteries and the various electrical systems. Problems with this switch can leave you stranded without lights, appliances, or even the ability to charge your batteries. Understanding common issues and troubleshooting techniques can save you time, frustration, and potential repair costs.
Several problems can arise with your travel trailer’s battery switch, leading to a loss of power or unexpected electrical behavior. These issues often stem from simple problems, easily rectified with basic troubleshooting. Let’s explore these common issues and how to address them.
Common Battery Switch Problems
The most frequently encountered problems with battery switches involve a complete lack of power, blown fuses, or incorrect switching between batteries. A lack of power can indicate a faulty switch, blown fuse, or even a problem with the battery itself. Blown fuses often point to a short circuit or an overloaded circuit somewhere in your trailer’s electrical system. Incorrect switching, often due to a poorly maintained or damaged switch, can result in unexpected power loss or even damage to your electrical components.
Troubleshooting Steps for a Non-Functioning Battery Switch
If your battery switch isn’t working as expected, follow these steps to systematically identify and resolve the issue. Remember to always disconnect the negative battery cable before working on any electrical components for safety.
- Check the Fuses: Inspect all fuses associated with the battery switch and the trailer’s 12V system. Replace any blown fuses with fuses of the same amperage rating. If a fuse blows immediately after replacement, there’s likely a short circuit somewhere in the system requiring further investigation by a qualified technician.
- Inspect the Switch Itself: Carefully examine the battery switch for any signs of damage, such as corrosion, loose wiring, or physical damage. Clean any corrosion with a wire brush and ensure all connections are secure and tightly fastened. If the switch feels loose or wobbly, it might need replacement.
- Test the Battery Connection: Verify that the battery cables are securely connected to both the battery and the switch. Clean any corrosion on the battery terminals and cable ends with a wire brush and baking soda solution. Ensure a solid connection is made.
- Test Battery Voltage: Use a multimeter to check the voltage of your trailer batteries. A low voltage reading indicates a problem with the batteries themselves, which would need addressing before troubleshooting the switch further. A healthy 12V battery should read around 12.6V when fully charged.
- Test Switch Continuity: With the switch in the “ON” position, use a multimeter to test continuity between the input and output terminals of the switch. If there’s no continuity, the switch is faulty and needs replacement. If continuity is present, the issue likely lies elsewhere in the electrical system.
Preventative Maintenance for Extended Lifespan
Regular maintenance can significantly extend the life of your battery switch and prevent many common problems. These simple steps can save you significant headaches down the road.
- Regular Inspection: Visually inspect the switch and its connections at least once a year, or more frequently if you use your trailer extensively in harsh conditions.
- Clean Connections: Clean any corrosion from the battery terminals and switch connections using a wire brush and baking soda solution. This prevents poor connections and power loss.
- Lubricate Moving Parts: If your switch has any moving parts, apply a small amount of dielectric grease to lubricate them and prevent corrosion. This is especially important in humid environments.
- Avoid Overloading Circuits: Don’t connect too many appliances to a single circuit, which can lead to blown fuses and potential damage to your battery switch.
Safety Precautions When Working with Battery Switches: Battery Switch On Travel Trailer Function
Working with your travel trailer’s battery and electrical system requires caution. Improper handling can lead to serious injury, including electric shock, burns, and explosions. Always prioritize safety to prevent accidents and ensure a smooth and trouble-free experience.Before you begin any work on your travel trailer’s battery switch or electrical system, it’s crucial to understand the potential dangers and take appropriate precautions.
This includes understanding the risks associated with both the battery itself and the electrical components it powers.
So, you’re an audiophile who loves to travel? Awesome! Check out this guide on building the perfect audiophile travel setup for those epic outdoor adventures. It’s all about lightweight, durable gear that still delivers amazing sound. But if you prefer a bit more off-the-grid experience, then you’ll want to explore this other resource on audiophile travel aetup for remote locations.
Both offer different tips and tricks for maintaining high-quality audio on the go, no matter your destination.
Battery Disconnection Procedures
Properly disconnecting the battery is the first and most important safety step. Failure to do so can result in accidental short circuits and potential injury. Always disconnect the negative (-) terminal first, then the positive (+) terminal. This prevents accidental sparking or shorts that could occur if the wrench or tool accidentally touches the chassis or another grounded metal part.
When reconnecting, reverse the process: connect the positive (+) terminal first, then the negative (-) terminal.
Safe Tool Usage
Use insulated tools specifically designed for working with electrical systems. Avoid using tools with damaged insulation or exposed metal parts. Always ensure your tools are in good working condition to prevent slips or accidents. A good quality wrench, specifically one with an insulated handle, is essential for securely connecting and disconnecting battery terminals.
So, you’re an audiophile who loves to travel? Awesome! Check out this guide on audiophile travel setups for tips on keeping your sound quality high on the go. It covers everything from portable DACs to noise-canceling headphones. Then, if you’re planning a more off-the-grid adventure, consider the advice offered in this other great resource on audiophile travel setups – it focuses on lightweight and durable gear perfect for remote locations.
Remember, good sound doesn’t have to stay at home!
Personal Protective Equipment (PPE), Battery switch on travel trailer function
Working with batteries and electrical systems always requires appropriate personal protective equipment. This includes safety glasses to protect your eyes from sparks or acid splashes, and gloves to protect your hands from corrosion and potential chemical burns. Consider using a face shield for additional protection if working in close proximity to the battery.
- Always disconnect the negative (-) terminal first, then the positive (+) terminal.
- Use insulated tools designed for electrical work.
- Wear safety glasses and gloves.
- Ensure good ventilation when working near the battery to avoid inhaling potentially harmful fumes.
- Never work on the electrical system if you are wet or in a damp environment.
- Avoid wearing loose clothing or jewelry that could get caught in moving parts or create a short circuit.
- Have a fire extinguisher readily available in case of an emergency.
- If you are unsure about any aspect of the process, consult a qualified electrician or RV technician.
Hazards of Improper Handling
Improper handling of batteries and electrical components can lead to several serious hazards. Battery acid is corrosive and can cause burns to skin and eyes. Hydrogen gas, produced by batteries, is highly flammable and can explode if ignited by a spark. Electrical shocks can cause serious injury or even death. Always treat the battery and electrical system with respect and follow safety guidelines to mitigate these risks.
For example, a poorly maintained battery can lead to corrosion buildup on the terminals, increasing the risk of a short circuit and fire. Furthermore, improper connection of wires can cause overheating and potential fire hazards.
Battery Switch Installation and Replacement
Installing or replacing a battery switch in your travel trailer is a relatively straightforward task, but it’s crucial to prioritize safety and follow the correct procedures to avoid electrical shocks or damage to your RV’s electrical system. Remember to always disconnect the battery’s negative terminal before starting any work.Replacing a faulty battery switch or installing a new one involves careful wiring and secure connections.
This process ensures the reliable operation of your trailer’s electrical system, providing power to your appliances and lights. Incorrect installation can lead to malfunctions or even fire hazards.
Installing a New Battery Switch
Before beginning, gather your tools: a screwdriver (likely Phillips and flathead), wire strippers/cutters, crimp connectors, electrical tape, and a new battery switch of the correct amperage rating for your system. Always consult your trailer’s wiring diagram for proper connections.
- Disconnect the Battery: Begin by disconnecting the negative (-) terminal of your trailer battery. This is a critical safety step to prevent electrical shock.
- Locate Installation Point: Choose a suitable location for the new switch, ensuring it’s easily accessible but protected from the elements.
- Mount the Switch: Securely mount the switch using appropriate screws and hardware. Ensure a firm and stable mounting.
- Identify Wires: Identify the existing wires connected to the old switch (or the wires from your battery and trailer’s electrical system). Common wire colors include red (positive) and black (negative), but this can vary.
- Connect Wires: Connect the wires to the appropriate terminals on the new switch. The switch will have clearly marked terminals for positive (+) and negative (-). Use appropriate sized crimp connectors to ensure secure and corrosion-resistant connections.
- Test the Connections: Before reconnecting the battery, carefully inspect all connections to ensure they are secure and properly insulated with electrical tape.
- Reconnect the Battery: Reconnect the negative (-) terminal of the battery.
- Test the Switch: Test the switch to ensure it operates correctly and that power is supplied to your trailer’s electrical system.
Replacing a Faulty Battery Switch
Replacing a faulty switch follows a similar procedure to installation. The key difference lies in disconnecting the existing switch.
- Disconnect the Battery: Disconnect the negative (-) terminal of your trailer battery.
- Remove the Old Switch: Carefully remove the old switch from its mounting location, taking note of how the wires are connected.
- Identify and Label Wires: Before disconnecting any wires, carefully label each wire with its corresponding function (e.g., “Positive Battery,” “Negative Battery,” “Trailer Lights”). This will help you reconnect the wires correctly to the new switch.
- Disconnect Wires: Carefully disconnect the wires from the old switch. Note the position of each wire on the old switch terminals.
- Install the New Switch: Follow steps 3-8 from the “Installing a New Battery Switch” section.
Wiring Diagram and Connector Illustrations
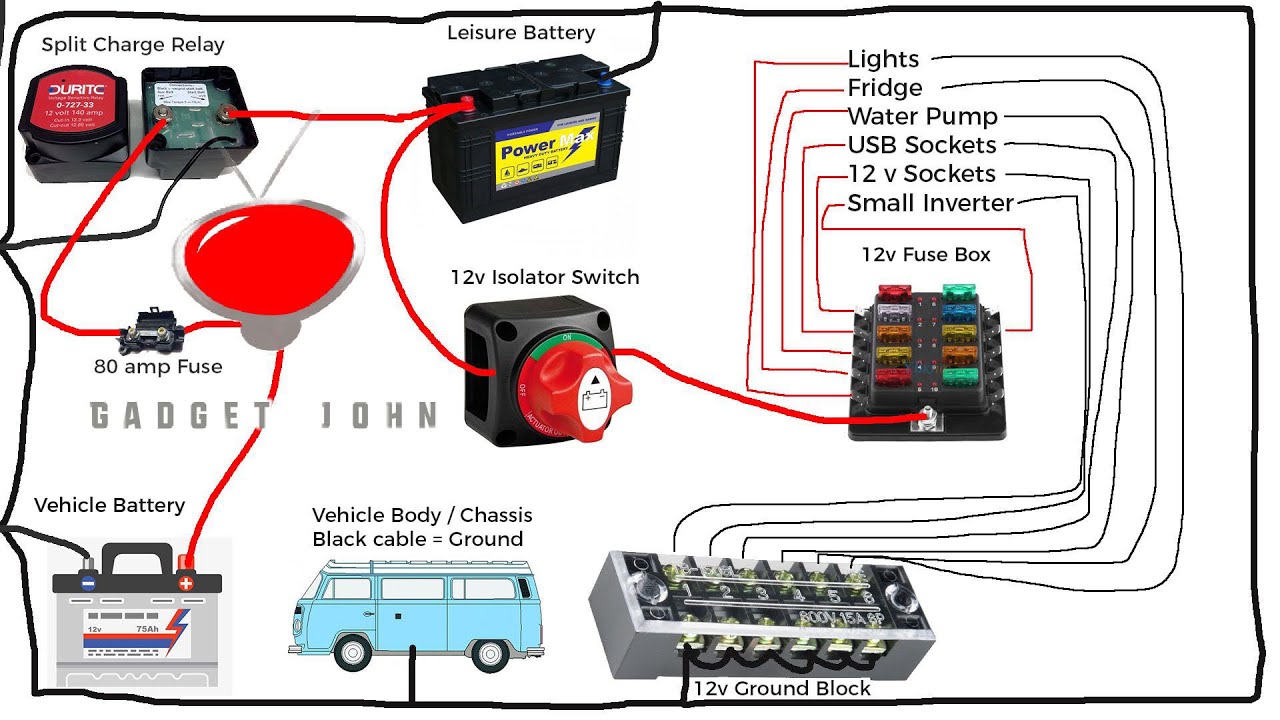
Imagine a diagram showing a battery switch with two large terminals, labeled “+” (positive) and “-” (negative). A thicker red wire (e.g., 8 gauge) from the positive battery terminal connects to the “+” terminal on the switch using a ring terminal connector. A similarly thick black wire (e.g., 8 gauge) from the negative battery terminal connects to the “-” terminal on the switch, also using a ring terminal connector.
Smaller wires (e.g., 12-14 gauge) of various colors, each with their own smaller ring terminals or bullet connectors, branch off from the switch to power different parts of the trailer. For example, a red wire might go to the trailer lights, while a black wire might go to the ground. All connections should be securely crimped and insulated with electrical tape to prevent shorts and corrosion.
Properly sized wire is essential to prevent overheating and ensure safe operation.
Mastering your travel trailer’s battery switch is a vital skill for any RVer. By understanding its function, troubleshooting common issues, and prioritizing safety, you’ll ensure a reliable power supply for all your adventures. Remember, regular maintenance and careful handling will extend the lifespan of your switch and keep your RV running smoothly. Happy travels!
FAQ
What happens if my battery switch is left in the OFF position?
Leaving the switch OFF completely disconnects your house batteries from the rest of your RV’s electrical system. This prevents any drain but also means no power to your appliances or lights.
How often should I check my battery switch?
Regularly inspect your battery switch for corrosion, loose connections, and any signs of damage. A visual check every few months is recommended, especially before and after extended storage.
Can I use a battery switch from a different RV?
While some switches might seem similar, it’s best to use a switch rated for your RV’s amperage and voltage. Using an incorrect switch could lead to overheating or damage.
My battery switch is making a clicking noise. What’s wrong?
A clicking noise often indicates a faulty switch or a problem with the circuit breaker. Check fuses and breakers before replacing the switch itself.
